Results matching “J1772”

Tesla Roadster Care

For owners who may be new or unfamiliar with the Tesla Roadster, I'll run through the basic information needed to preserve this rare and special vehicle.

The most obvious concern is properly maintaining the battery pack. If the Roadster is left unattended and without power for weeks or months, the battery back will slowly discharge until the pack is fully depleted. If this happens, the battery pack may be ruined. Even if plugged in, if power is interrupted by a popped breaker, extended outage, service disconnection, etc., permanent damage to the battery pack can occur.

Also of concern is temperature. The Roadster should not be left unplugged in extreme temperatures. If the battery pack gets hot, it should be plugged in so it can cool. Consult the owners manual for more information.

Charging

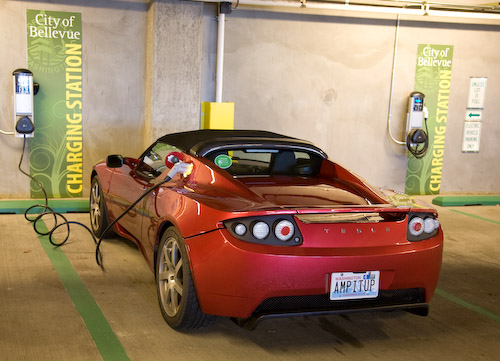
Level 1 In the United States and Canada, the Roadster can be charged at 120V with a simple cord sold as the MC-120. It just connects the car to power with no EVSE logic and the car assumes a 15A circuit suitable for charging at 12A. At this power level, the car can't run the full cooling system and in fact uses a lot of the power just to run the coolant pump. This means a slow rate of charge, and in fact in hot weather, may use all of the power just trying to cool the battery pack. In comfortable weather, not too hot and not too cold, and no rush to get charged, this can be an effective way to charge. Some owners used Level 1 exclusively. Since the coolant pump tends to run continuously, even after charging is complete, there may be a corresponding reducing in the lifetime of the coolant pump.

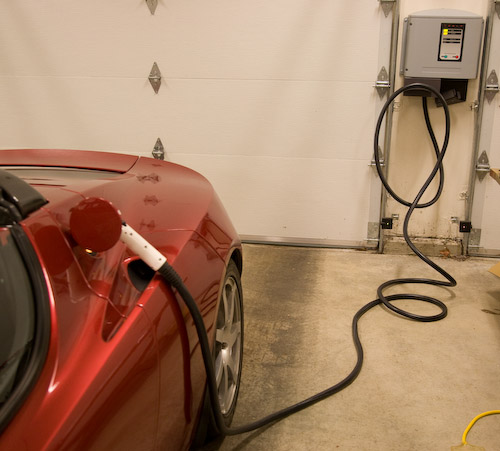
Level 2 charging means connecting to 240V single-phase power using an EVSE that communicates the maximum current draw allowed for the circuit. It uses the same communication protocol as standard J-1772 charging stations. Having more power means the battery pack can be better thermally managed, which can make quite a bit of noise when the fans, compressor and pumps are all going full tilt. The maximum charge rate of the Roadster is 240V/70A. Unless we were in a hurry on a road trip, we generally charged at 240V/32A which yields good energy efficiency and may be nicer to the battery.

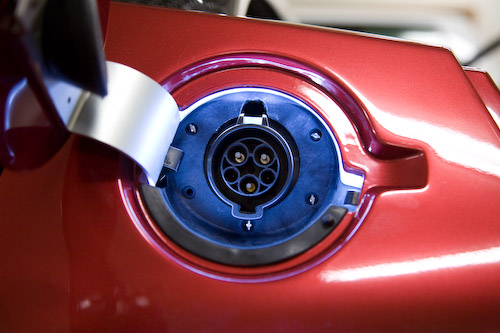
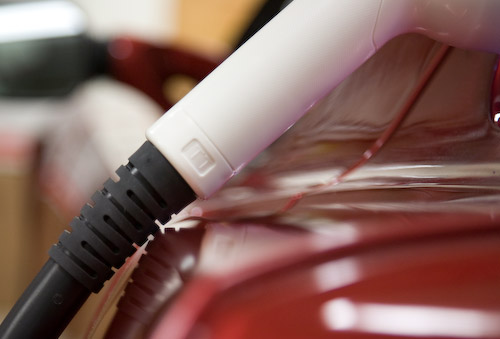
The Roadster can charge from a standard J-1772 station with an appropriate adapter. Tesla sold one for a while and there's an aftermarket adapter.

Charge Modes

The Roadster has four charge modes, used for different purposes.

Standard Mode limits charging to the middle 80% of the battery pack, not letting the charge level get too high and warning the driver, and even shutting the car down, before getting critically low. This is the mode used for daily charging of a Roadster that's driven locally with some regularity.

Range Mode opens up the full charging range, allowing a higher state of charge and enables driving down to a lower start of charge. Range mode also limits power from the pack, and thus reducing maximum acceleration in the name of extending range. Occasional range mode charging didn't seem to have a negative effect on our battery pack, but charging frequently to the top of range mode may accelerate the loss of battery capacity. When we owned a Roadster, we'd do a full range mode charge at the start of long road trip, then switch over to standard mode for driving.

Performance Mode uses the full charging range, allows the battery to get warmer while charging, and allows maximum power (full acceleration). This is appropriate for driving on a track, but probably accelerates loss of battery pack capacity if used often.

Storage Mode displays the state of charge like Standard Mode, but will let the state of charge drop to around 30% then will maintain that level of charge. This is the best mode to use when the Roadster won't be driven for weeks or months. The car must be plugged in to maintain the health of the battery pack. The disadvantage of Storage Mode is that if the power supply is interrupted, it will start discharging from around 30%, so it will get into trouble sooner than if left in Standard mode. That's probably more of a concern if it's in long term storage and ignored vs. being kept for the winter in your garage where you'll notice of the power goes out or the breaker gets tripped.

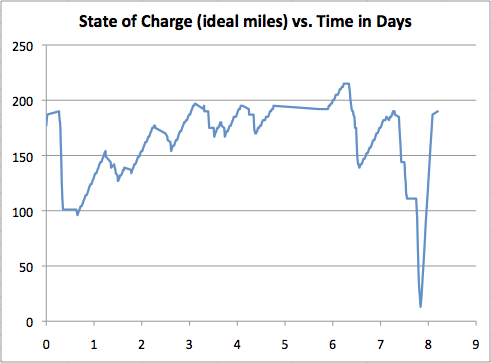
An example charge screen:

roadster-charge-info.jpg

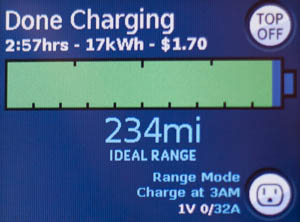
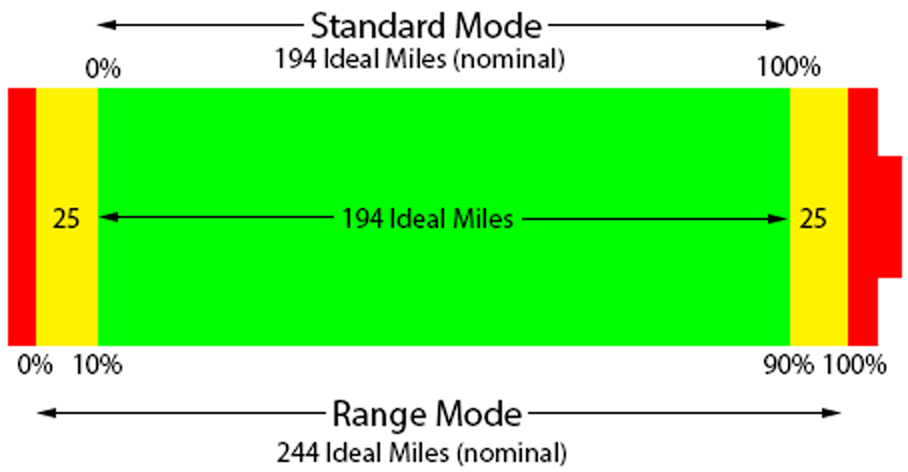
The drawing below shows how to interpret the state of charge in the two main charge modes. Range values are for the original 53 kWh battery pack when new.

Charge-Modes.png

Vehicle Log

The Roaster maintains a detailed internal log which can be downloaded via the USB port in the console. Although the format of the logs isn't documented by Tesla, various owners have been able to decode and extra a great deal of data. The log file has two sections: a long term section that has basic info and a more detailed section of recent driving and charging. See the page on the VMSParser I created for more information.

Remote Monitoring

The Roadster did not have support for remote monitoring, not at all for the 2008 (v1.5) Roadster and nothing driver-accessbile for the 2009 and later (v2) Roadster.

There is an aftermarket system availble, the Open Vehicle Monitoring System or OVMS. OVMS allows for remote monitoring of charging, GPS tracking, custom charge settings, and viewing battery metrics. In addition to allowing manual remote monitoring, it can also send low-battery alerts and unexpected motion alerts if the car moves not under its own power.

More Resources

There are a number of other entries on the blog detailing our adventures with the Roadster, plus another collection of longer Roadster articles of practical and historical interest.

The Tesla Motors Club forum is the best community resource around, although its focus has natually shifted to the newer Tesla vehicles.

Where Do You Gas Those Things Up?

updated 9/6/2011 2:42 pm: added nerdy charge graph

Last week, Cathy and I took the Roadster for a car show and week of island hopping through Washington's San Juan Islands and Vancouver Island in British Columbia. It was a lovely trip and unique in our EV road trip experiences in that we did the entire 450-mile trip using only 120V charging.

We are frequently asked where we charge our electric cars. The question is often accompanied by a pained expression that tries to offer sympathy for the sacrifice we make by driving electric. The answer is: mostly at home. People are frequently surprised to learn we have found it to be more convenient than going to a gas station.

Occasionally, we take a trip that requires charging on the road. That generally requires planning and finding electric vehicle charging stations. For this trip, there were some charging stations available, but they turned out to be both overpriced and unnecessary. We had chosen B&Bs that would allow us to charge from normal household outlets. On one island this was a big help as there were two otherwise equivalent choices: one that wanted to charge us $20 to use $1.60 worth of electricity and another that said we could do it for free. We gave our business to the one that didn't think we were incapable of doing math. Since we were taking a leisurely tour, and mostly on small islands, overnight charging at 120V was plenty for our daily driving needs.

The convenience of being able to fuel up from any outlet became especially apparent when we drove past this gas station in Sooke, BC.

07.jpg

We were on our way to Port Renfrew, some 45 miles further west along the southern coast of Vancouver Island. Had we been in a gas car, this would have been our last chance to gas up before our return, some 90 miles for the roundtrip plus any side excursions. Because we were in an electric car, and outlets are far more common than gas stations, we didn't care.

At Port Renfrew, we were going to be staying in a yurt at the Soule Creek Lodge. We'd contacted them in advance and knew they had an outlet we could use to charge the car. Charging at 120V only yields about 3 to 5 miles of range per hour of charging, which is painfully slow if you are waiting while you charge, but totally adequate if you're sleeping through it.

yurt_charging.jpg

Our one night there, we picked up 53 miles of range, which was plenty to get us through the next day's driving.

My only regret for the trip was not getting a photo at Wildwood Manor on San Juan Island where we had deer grazing next to our charging car. Somehow you just never see deer grazing at a gas station.

Nerdy Charge Graph

Here's a graph of our state of charge for the trip. It shows the car's range in standard mode ideal miles, which means we can go that many miles at 55 to 60 mph on the highway, with another 25 miles in reserve.

soc_graph.png

The first steep dive is the 90-mile drive to Anacortes, WA, to catch the ferry. Then there's a flat spot while we wait five hours after missing the cut-off for the unexpectedly popular first ferry by 5 minutes. Over the next three nights, we charged up overnight on Lopez and San Juan islands working back to a full standard mode (90%) charge, then a fourth charge returned us to full again. There are also a couple of little afternoon charges in there. The fifth charge is in Victoria, BC, after which the car stayed parked for a full day, then we did a range mode charge prior to departing for Port Renfrew. The overnight at Soule Creek Lodge got us back up to the top of standard mode (about 190 ideal miles). Finally, the long 170-mile drive home with a short stop for lunch then a longer stop for the ferry ride. We got home with 10 miles of range left (thanks to my heavy right foot as it became clear we had plenty of charge), plus the 25 miles in reserve. The last spike shows the steep slope of 240V/32A charging at home.

A LEAF could do a pretty similar trip. Depending on the starting point, it might need a little charging on the way to Anacortes (like spending an hour or two at a J1772 charging station at the Burlington outlet malls instead of spending five hours in the ferry line). Instead of spending two nights with a full day in Victoria (where we didn't drive or charge), spend one night in Victoria on the way out and the second night on the way back.

Progress on the Roadster Conversion to J1772

We've made some progress on a more robust Roadster J1772 conversion. As part of the conversion, we want a circuit that monitors the J1772 proximity pin and cuts the pilot signal when the latch on the connector is released. With such a circuit, a Roadster will behave as a proper J1772-compatible EV and stop the current flow when the J connector's latch is opened, thus preventing any damage to the connector pins which can occur when pulling out the plug while charging.

Cathy and I worked up the basic idea together and got a bunch of help from the EV community. Cathy put in a ton of work selecting components, soliciting feedback, iterating the design, and designing the circuit board. Our solution works without drawing any power from the car, it just uses a tiny bit of power from the incoming line voltage during charging.


We just got the first set of boards back, put one together, and tested it. It works beautifully, performing even better than I had hoped. The response time from when the switch on the connector is pressed until the pilot signal is cut is about 2.2 milliseconds. When hooked up during a charge, there's no perceptible delay between when the J1772 latch is pressed and when the Roadster stops charging.

Even more geeky information is available on Cathy's page of cool details.

In other news, the cable vendor that said they could produce the replacement inlet assembly cable for us took six weeks of excuses and delays to finally say they don't want to do it. So, we're back to the drawing board on that.

2008 Tesla Roadster Converted to J1772 Charging

Cathy and I, with help from Dave Denhart and many others in the Tesla and broader EV communities, have converted our 2008 Roadster and Tesla High Power Wall Connector to use the new industry standard J1772 inlet and plug. This will allow us to charge without an adapter at the tens of thousands of Level 2 charging stations that will be installed in the US by the end of 2011.

j1772-charging-coulomb.jpgWhat we have is functional and completely reversible, but not ideal; we view this as a version 0.9 conversion. As there are very few J1772 charging stations currently installed, and the numbers probably won't take off until late spring or early summer, we have time to develop a better solution before it actually becomes compelling for Tesla owners to convert in significant numbers. I'm sure Tesla Motors could do a much better job of creating an integrated solution and I would prefer that to having the owner community develop a conversion solution.

We've hear rumors that Tesla is developing an adapter, but are still waiting for official word on what, if any, J1772 solution they will provide. While an adapter would give us a way to charge, we have heard from many owners who would prefer to convert their vehicles and charging equipment to the industry standard rather than leave an expensive adapter vulnerable to theft while charging.

Our effort started last summer when Cathy and I began working with Dave to figure out what it would take to build an adapter that would let a Tesla Roadster charge from the Level 2 J1772 charging stations. We discovered that SAE adopted Tesla's extension to the older J1772 communications standard, so a simple pass-through connector that converts Tesla's charge inlet to the J1772 inlet will allow charging to occur, although there is an issue, which is explained below.

Once we understood the protocol, Cathy and I built and tested a pass-through adapter. When I let the Tesla owner community know about our adapter in mid-September, I wasn't surprised to hear that lots of owners were thinking about those thousands of chargers, but I was surprised how nearly all who expressed an opinion agreed with us that the right way to do this was just to convert the Roadster to use the J1772 inlet. From what I'm hearing from new and prospective owners, it seems to me that many potential Roadster customers are put off by the Tesla plug and this is probably already becoming a barrier to sales.

In the absence of any word from Tesla Motors about a J1772 upgrade path, we've been slowly working toward doing a conversion ourselves. A few weeks ago, we finally obtained an ITT Canon 75A UL-approved inlet and plug pair from Clipper Creek. The plug cord is intended as a replacement cable for Clipper Creek's model CS-100, and carries the same power and signal wires as the TS-70 aka Tesla's High Power Wall Connector (HPWC, formerly the HPC). Clipper Creek also sells a holster for the J1772 plug that can be used to replace the holster for the Tesla plug.

With the necessary hardware in hand, we starting tackling the engineering challenges in getting the inlet mounted inside the Roadster's charge port: there's limited space to work with and the Roadster wasn't designed with the shape of the J1772 plug in mind, so getting the plug and cord to clear the body is tricky. It took a bunch of measuring, brainstorming, numerous experiments, a couple of laser-cut bracket prototypes, some Dremel work on the inlet cup, and then an adapter designed in CAD and printed on a 3D printer to get something functional.

This is what the back of the upgraded inlet port looks like. The blue piece is the mounting plate Cathy designed in CAD and we fabricated on a RepRap 3D printer at Metrix Create:Space.

inlet-adapter-plate.jpgHere's the work in progress just before installing the J1772 inlet and putting it all back together:

ready-to-assemble.jpgHere's the inlet mounted in the Roadster's charge port:

inlet-in-chargeport.jpgThe ITT Canon cord plugged into the Roadster's charge port:

plugged-in.jpg
Charging from our HPWC, now converted to J1772.

j1772-charging-home.jpgThe top of the inlet tilts back to angle the J1772 cord up. This works pretty well for the ITT Canon cord with enough clearance at the top of the port that it's easy to slide the plug in and engage the lock, easier than plugging in the Tesla connector in fact. The rubber strain relief on the cord barely rests on the body, plus our Roadster has the paint guard protection there, so I'm not worried about that minor contact damaging the paint.

itt-canon-cable.jpgIt's not quite as nice with the plug and cord used by the ChargePoint Coulomb chargers, but I think it's OK for use on the occasional road trip.

coulomb-cord.jpgIn addition to the cable clearance issue, there's another concern with our v0.9 conversion strategy that has to do with the largest difference between the Tesla and J1772 communication protocols.

The Tesla plug uses four contacts: two for power, one for ground and one for the pilot signal. The pilot signal is a low-voltage communications protocol that allows the charging equipment to tell the car the maximum amperage supported and allows the car to ask for the power to be turned on and off. The pilot signal is not connected to the car until the plug is connected and the locking switch is engaged. This switch plays a second role: if the driver tries to remove the plug in the middle of a charge, sliding the switch back interrupts the pilot signal which tells the car to stop charging. This happens very quickly so that the driver cannot get the plug untwisted and removed to break the electrical contacts while current is still flowing. It's important to prevent this because doing so can cause arcing, which would damage the contacts.

Instead of interrupting the pilot signal, J1772 uses a fifth wire for this purpose. Like the Tesla plug, the locking mechanism on the J1772 plug makes the proximity connection, so that when the driver wants to remove the plug and slides the lock it interrupts the proximity connection, thus telling a J1772 car to stop charging immediately (within a tenth of a second). Unfortunately, the locking switch on the J1772 plug doesn't interrupt the pilot signal.

With our v0.9 conversion (or a simple pass-through adapter), the driver can unlock the J1772 plug without the car knowing, and then pull the plug while power is flowing. Cathy and I need to make sure we don't do that. To solve this issue, we need to design a circuit that watches the proximity pin and interrupts the pilot signal when the J1772 plug is unlocked. I don't expect this to be difficult, but we haven't done it yet.

We have already made some improvements in the design. This is version 3 of Cathy's inlet mounting plate design, which we plan to print for our next revision:

bracket-front-v3.jpgIn addition to the improved mounting plate, our next steps are:

1) Hope that Tesla Motors provides an official conversion solution before it matters to most owners, thus saving us the remaining steps.

2) Design a circuit to monitor the proximity pin and disconnect the pilot signal when the J1772 plug is unlocked.

3) Test with other J1772 plugs and possibly work on a better solution for cable clearance over the body panel.

4) The 2010 and later Roadsters have the inlet cable assembly connecting to the PEM in a different location. There may also be other differences. We haven't looked into it yet and don't know if it will be more or less difficult to convert than the 2008 Roadsters.

5) Before recommending an unofficial conversion to other owners, we'll need to find out how this will impact our warranty. Tesla Motors has been cooperative with our efforts: they sold our group an inlet cable assembly so that we could do the conversion reversibly. We hope they will continue to be supportive rather than forcing us to wait until our warranties expire before being able to effortlessly access standard J1772 public charging stations.

An End to the Dark Ages of EV Charging

I had the opportunity to test out another ChargePoint charging station today. I was more prepared than I was the first time, so I got to try out the whole experience. I'm so pleased to see the future of electric vehicle charging. I'm not going to miss charging at RV parks at all.

This time, I had my access card activated and attached to my ChargePoint account. The easiest way to do this is to go to www.mychargepoint.net, sign up for an account and order a card. It's best to do this well in advance of wanting to charge. (Other charging station companies may offer similar functionality, but so far I've only been able to try out ChargePoint chargers installed by Charge Northwest and EV Support.)

I also downloaded the ChargePoint App to my iPhone and logged into my account.

Step one in the charging process is to locate a charging station. This can be done with the iPhone app or through the ChargePoint Find Stations web page. Not only can you find stations, you can check to see if they are functioning and available.

When I arrived at the charging station, I removed the J1772 cord from the station by sliding the silver button back to release the catch.

charge_cord.jpg

Next I plugged the cord into the car. My car requires a plug adapter, which doesn't yet exist, so Cathy and I hacked one together. Modern EVs will just have the right receptacle on the car, so you won't have to fool around with the ludicrous cable adapter shown here.

ready_to_charge.jpg
(photo courtesy of Michelle Billmaier)


To start the charging session, the user either places the ChargePoint card against the labeled spot on the charger (as shown above), or taps the pin for that station on the iPhone and then taps the start button. Theoretically, you don't even need to carry the ChargePoint access card, but it seems like a good idea just in case you can't get cell reception.

start_session.jpg

After starting the session, refreshing the screen will show the pin has changed colors from green to blue so that other EV drivers can tell that it's in use. Tapping on the pin will show that the start button has changed to a stop button. (Tapping the yellow button will show driving directions to the charging station.)

station_in_use.jpg
Checking the car's info screen shows that the charge is underway.

touchscreen.jpg
In the old days, when we took an electric vehicle on a road trip, we had to charge from outlets at RV parks and were confronted with an unpleasant problem...

Once you get the charge started, it's pretty boring: the car charges while you watch. You'd like to leave the car and go do something more interesting than watch it charge, but if you do that you risk having the charge stop early (like 5 minutes after you walk away) because of some problem. Maybe the breaker popped, or something interrupted the power briefly, any number of things. When you come back, perhaps hours later, you're not happy to find the car is still in the same state of charge as when you left, so now you have to do it again, and this time you're going to babysit it the whole time.

This is where using networked chargers designed for this purpose really shines.

If you're charging from a ChargePoint charger, you can check your charge session's status either from the iPhone app, or through a web browser (perhaps at a cafe, or in your "kabin" room).

session_screen.jpg
Wait though, it gets even better.

Suppose the more interesting thing you want to do is sleep, because you've been driving all day. It's not very convenient to check the session status every few minutes while you're trying to sleep. Even if you're eating dinner or surfing the web, you don't really want to constantly check your charge session. (See how quickly we get spoiled? Previously, there was no way to check the charging without being at the car, and yet now we don't want to have to bother with refreshing the screen on our iPhone.)

You can configure your ChargePoint account so that you get a text message or email for any or all of four events: charge completed, charger unplugged, ground fault error, or over current error.

To test this, I unplugged the cable from the car while it was charging. Shortly after that, I got a text message:

text_message.jpg
The only thing cooler than getting that message is knowing that not getting that message means your charge is still running.

And so we see the start of a new era and the end of the dark ages of EV charging.

J1772 Charging for the Tesla Roadster

We are about to see a mass deployment of public level 2 SAE J1772 charging stations, over 14,000 from The EV Project alone. This compares to fewer than 100 public Tesla charging stations (240V/70A High Power Connectors, aka HPCs). Over the next 12 months, I expect that the availability of level 2 J1772 chargers will totally overwhelm all other charger types.

While most of these 240V chargers will be limited to 30A or 32A, J1772 chargers capable of supplying 240V/70A are available from Clipper Creek with many other vendors also working on charging stations.

Teaming up with a number of other Tesla owners and members of the broader EV community, Cathy and I have been looking into what would be required to bring J1772 charging support to the Roadster community.

The good news is that Tesla and J1772 use the same communications protocol to establish the connection and start/stop charging. This didn't happen by accident. Tesla Motors was involved early on in the development of the J1772 spec. But the Roadster was designed before the new J1772 committee even got going, so the Tesla charging protocol was designed based on the old J1772 specification which used the Avcon connectors and limited charging to 40 amps. Tesla extended this protocol up to 70 amps, and successfully lobbied the J1772 committee to adopt this extension. Cathy and I have confirmed that the SAE J1772 JAN2010 spec exactly matches the amp limit waveforms produced by the Tesla HPC at all amperage limits from 12A to 70A.

So, the Tesla Roadster uses the same communications protocol as J1772. (Except for the button on the HPC that can be used to start charging; I don't know how that works.) The only barrier to charging a Roadster from a J1772 station is the Tesla plug. We confirmed this by building a proof-of-concept adapter and using it to charge our Roadster at a Level 2 J1772 charging station in Olympia, WA, last Friday (Sept. 10, 2010).

J1772-charging.jpg

J1772-touchscreen.jpg
We'd like to thank Dave Denhart, Rich Kaethler, Chad Schwitters, Martin Eberhard, and Dave Kois for helping us with this proof-of-concept project. Thanks also to Jim Blaisdell of Charge Northwest for helping us find a level 2 charging station and getting us a ChargePoint Network card overnight. Our crude adapter is not a robust solution. As you can see it's quite bulky (since we didn't want to cut the cable to a working Tesla plug) and isn't watertight enough for general outdoor use.

When the Roadster was entering production, there was no standard J1772 plug, so Tesla had to design their own. That was a necessary step, but now that the final standard uses a different plug, I think we need to find a real solution to this incompatibility. As I see it, there are at least 4 possible solutions:

  1. An upgrade to switch both the Roadster and HPC to use J1772 connectors.
  2. A compact adapter that converts J1772 to the Tesla connector.
  3. A new pigtail for Tesla's universal mobile connector (UMC).
  4. A new pigtail that requires purchasing a re-engineered UMC.
A new pig tail for the current UMC (solution 3) isn't very appealing as the UMC is limited to 40A, cutting us off from any 70A J1772 chargers, while also requiring us to stuff a large, heavy, awkward cable into our trunks just to charge at a station that is guaranteed to have a cable that will reach our charge port. It's also not nice for those of us who have already invested in a different mobile connector, like the original MC240 or the RFMC. Solution 4 is even worse than 3 as it shares all of the problems and it would require everyone to purchase a new mobile connector.

A compact adapter (solution 2) is better in that it could support the full 70A charging and also be quite compact, little more than a J1772 receptacle and a Tesla plug. It will still be quite expensive as it requires a Tesla plug. My guess is that it would cost at least $1,200 retail, based on what Tesla charges for the MC240 and UMC. It also has the downside of being an obvious target for malicious theft when the car is left charging unattended. Nissan Leaf owners won't have to leave an expensive, unsecured device dangling from their cars when charging, why should we?

Full conversion to J1772 (solution 1) sounds radical until you see a J1772 receptacle. It's very close to the size and shape of the inlet in the Tesla charge port. Once I saw that, it required zero imagination to picture a Tesla Roadster with a J1772 receptacle in place of the proprietary Tesla charge inlet.

The downside of solution 1 is that it would also require replacing the plug on our home chargers (HPC or mobile connector). This could be done by either replacing the cable, or by using the old Tesla inlet and a J1772 cable to make a Tesla-to-J1772 converter.

The retail cost of an ITT Canon UL-certified J1772 receptacle and cable pair rated for 75A is $825 from Current EV Tech. I don't know of anyone else selling these newly-available connectors, but I do expect it to be a competitive market much larger than just Roadster owners. Even adding in reasonable labor costs, it seems to me that converting a Roadster and HPC should be near or below the cost of a J1772-to-Tesla adapter.

I have been told that Tesla Motors is investigating ways to bring J1772 support to the Roadster which may include either a compact stand alone adapter (option 2) or a J1772 pig tail for the Tesla universal mobile connector (I'm not sure if this is option 3 or 4). They are early in the process and not promising anything at this point. From what I have heard, Tesla Motors is not interested in providing a full J1772 conversion (option 1) and hasn't even committed to supporting J1772 on the Model S.

It's possible the full J1772 conversion could be done even if Tesla Motors doesn't give us an official way to do it. I expect our group will continue exploring ideas in case we have to tackle the problem ourselves.

We are several months away from having a significant number of Level 2 J1772 chargers installed in metro areas targeted by The EV Project, and even further away in other areas of the US. There's plenty of time left for both Tesla Motors and the owner community to explore possible solutions, but I believe this will soon be an important issue for every Roadster owner who wants to be able to take advantage of the soon-to-be pervasive J1772 charging infrastructure to conveniently drive beyond the Roadster's single charge range.


1

Find recent content on the main index or look in the archives to find all content.