|
Northern Saw-whet Owls
How-to
Last Updated July 4, 2025
updated lens IR compatibility chart
Contents
Although we have done wildlife and nighttime astronomy photography, we learned a great deal about these owls and also about infrared photography and developing a workflow that enabled us to keep up with processing up to 800 GB of photos and video per day.
When we first saw an owl in the nest, we had no idea where it was in the nesting cycle, thus didn't know when the interesting stuff would start happening. We didn't even know what interesting things we would see; the owls constantly surprised us with new behavior. If they come back next year, we'll be much better prepared and have a good idea of when we need to get set up for full-time monitoring, and how to time equipment rentals.
Saw-whet Owl Nesting
We were perhaps very lucky to spot an adult owl in the nest during the day pretty early in the nesting process. According to the literature, northern saw-whet females can mate and nest twice per season, so you could see a nesting cycle offset from what we saw this year.
Throughout, we rarely saw an adult during the day, maybe once briefly every 3 to 7 days. As soon as the owlets were mature enough to start appearing in the opening, they quickly became active day and night. Shortly after that started, we stopped seeing an adult in the nest, presumably signaling that the female had moved on, leaving the rest of the upbringing to the male. It's possible we might not have caught on to the owl nest until the owlets were active, so that could easily be the first sighting. Unlike the woodpeckers we have watched nest, the owlets don't seem to make noise. We didn't hear anything until the last owlet was alone in the nest.
In case it's helpful, here's the timeline of what we saw.
- March 7 First owl sighting
- April 25 First owlet sighting
- April 26 Last adult owl seen inside the nest
- May 5 First fledge
- May 18 Last fledge
References: Cornell Labs/All About Birds • BirdWeb • Buffalo Bill Center of the West • Wikipedia
Infrared Photography
Camera Conversion
Photographing the owls at night can be aided by infrared (IR) because IR lights can be used to illuminate the nest without disturbing the owls. Like humans, other mammals, and most birds, owls can't see IR.
Most consumer cameras have sensors that are sensitive to IR light but they have filters that block IR and also ultraviolet (UV). To convert a camera for IR use, the factory filter must be removed. We had LifePixel convert one of our cameras. Their prices are competitive, their work was professional, and they performed the service within the expected timeframe.
A key aspect of photographing with IR is that the focus for a given subject changes when the spectrum of light being used changes. Compared to using visible light, the focus position needs to move in when using IR, and it varies as the spectrum of light changes from sunlight to IR lighting around sunrise and sunset. You may have seen red markings on the focus indicator of camera lenses; that's why.
For IR photography, a mirrorless camera that does on-sensor focusing is preferred, otherwise focusing is a guess-and-check process. We used a Canon EOS R6 Mark II.
Lens Compatibility
Not all lenses are compatible with IR photography. Some lenses emit IR light internally. With the normal sensor filter in place this is completely invisible, but shows up when the filter is removed. Doing night photography in IR is quite sensitive to this effect due to the low light level coming into the lens.
We found this out the first night we used our converted IR camera. After that, we started testing lenses by taking photos with the lens cap on, exposing for 2 seconds at ISO 25,600, sampling across the aperture and zoom levels supported by each lens. Our test results are below. Pass means there was no IR light source in the test image, fail means the test image captured visible IR generated by the lens. The fail notations link to a sample test image showing the issue; the images that pass are solid black.
| Lens | Result |
|---|---|
| Canon EF 24-105mm F4L IS USM | 24-92mm Fail, 100-105mm Pass |
| Canon EF 50mm F1.4 USM | Pass |
| Canon EF 600mm F4L IS III USM | Pass |
| Canon RF 100-500mm F4.5-7.1L IS USM | Fail |
| Canon RF 24-105mm F4L IS USM | Fail |
| Canon RF 600mm F4L IS USM | Pass |
| Canon RF 70-200mm F2.8L IS USM | Fail |
| Tamron SP 15-30mm F/2.8 Di VC USD G2 A041 | 30mm Fail, Pass below 26mm |
Lens Rental
For night owl photography, fast telephoto lenses are preferred. The best choices are the high-end lenses you see professional sports and wildlife photographers lugging around. Whether it's the top-end lenses or more moderate choices, it may be possible to rent an appropriate lens for a brief photography project at a much lower cost than purchasing a lens. In the Seattle area, Glazer's Camera has an extensive rental department that offers a wide variety of rental lenses by the day or week. We've used them not only for this crazy project, but anytime we're considering a new lens and want to test it out before committing to a purchase. Glazer's will credit one day's rental toward the purchase of the same lens, so it can be a free way to make sure you pick the right lens, and a cheap way to avoid buying a lens that doesn't meet your needs.
Filters
To help with the focus shift, adding an IR filter reduces the effect caused by mixing sunlight with IR light around sunrise and sunset. We used IR LED panels that list their light wavelength at 850nm. The IR filters we found on the market cut light off at either 740nm or 830nm. We got improvement on the focus shift problem using a Hoya R72 filter, which cuts off light below 740nm. We wanted to try an 830nm filter to cut out more of the spectrum below what our light panels produce, but couldn't find one that fit the lens we were using. We tried filters from LifePixel and GREEN.L, but the outer diameter of their 52mm filters were just a little too large to fit in the filter slot of the Canon 600mm f/4 lens. We expect, but haven't confirmed, the same issue applies to Canon's other large prime telephoto lenses (400mm f/2.8, 800mm f/5.6, 1200mm f/8).
There are also "cut filters" that block IR and UV to let only visible light through. You might expect this would turn a camera converted to full spectrum back to a normal visible light camera, but it doesn't really work that way. To go back to a normal camera, the cut filter would have to match the original filter that was removed from the sensor. Without a precise match, the response across the spectrum is inevitably going to be different from how the camera was designed, so the math that converts the sensor readings to the colors we see is going to be a little off. In short, once a camera is converted to full spectrum, it's no longer going to work for producing accurate color photographs. We occasionally used a cut filter with our night camera during the sunrise transition to get usable but not quite perfect color photos before switching to the daytime camera.
Light Sources
We are pleased with the results using Univivi 850nm IR LED light panels. Although the IR light is invisible, each LED emits a faint red light when they are on. They are inexpensive, well made, and come with mounting hardware that makes them easy to aim. A light sensor mounted on the bottom detects ambient light so they save power during the day and come on automatically at night. Search for "Univivi IR LED" at your favorite retailer. We used 8-watt, 10-watt, and 15-watt versions.
The only issue we had with the lights is that the power cord isn't long enough to spread them out. We sort of solved this by using cheap 10-meter 12v DC power extension cables. This is probably a terrible idea. Running DC long distance is problematic, especially if the gauge of the wire isn't high enough for the amperage, which I suspect is the case using this cable with these light panels. We tested the light with and without the extension cable and found that adding the cable dropped the light level by about a 1/3 of a stop for the 8- and 10-watt models (which use a 12V/1A power supply) and 2/3 of a stop for the 15-watt model (which uses a 12V/2A power supply).
We live in Seattle. It rains here. So we sealed the power cable connections with Scotch Linerless Rubber Splicing Tape which is both better suited to the job and easier to work with than gummy black electrical tape.
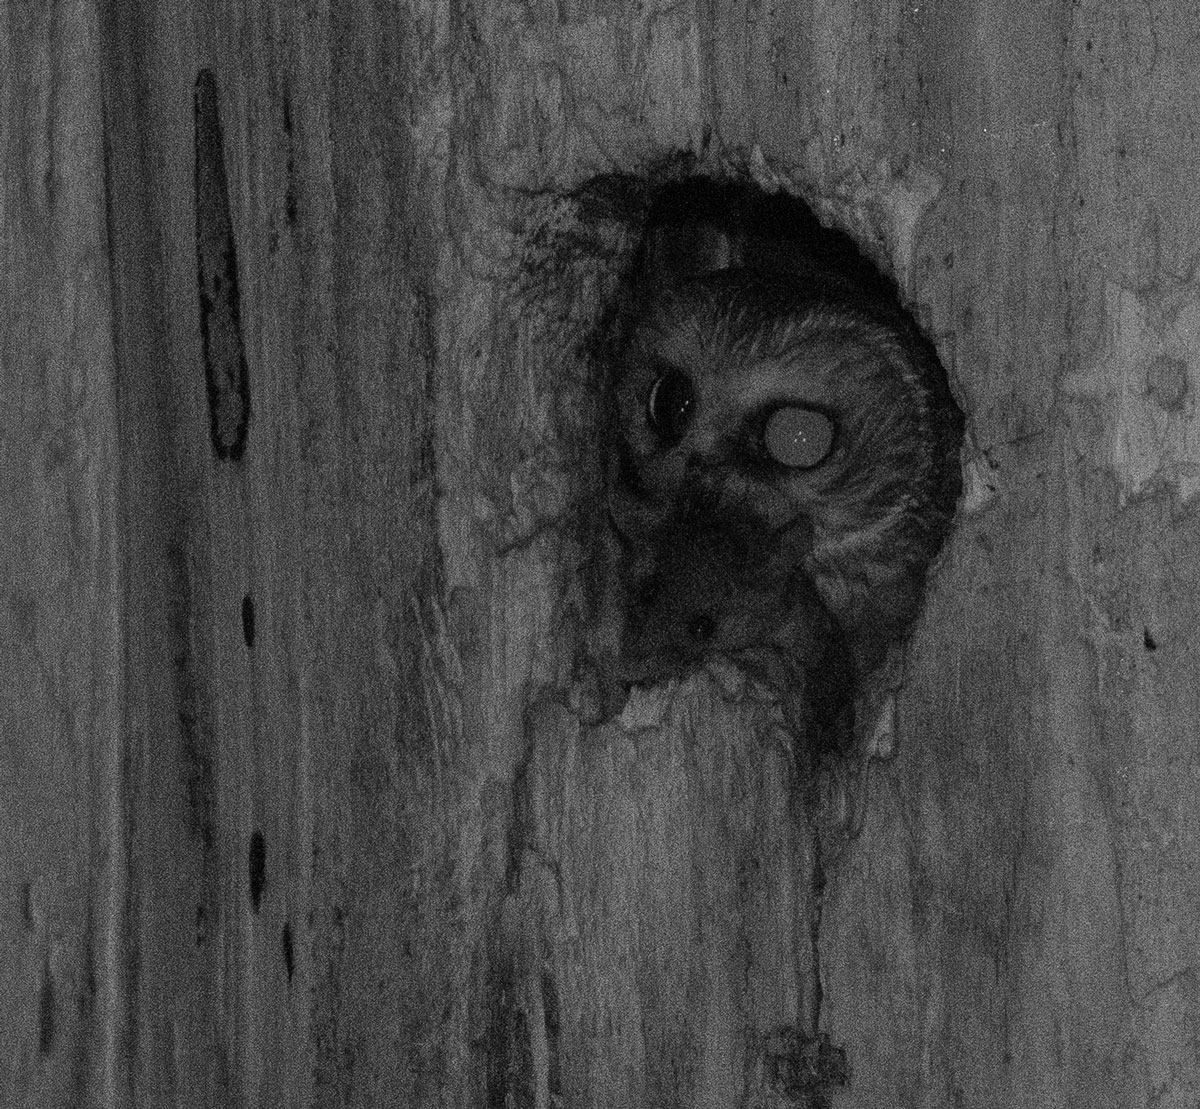
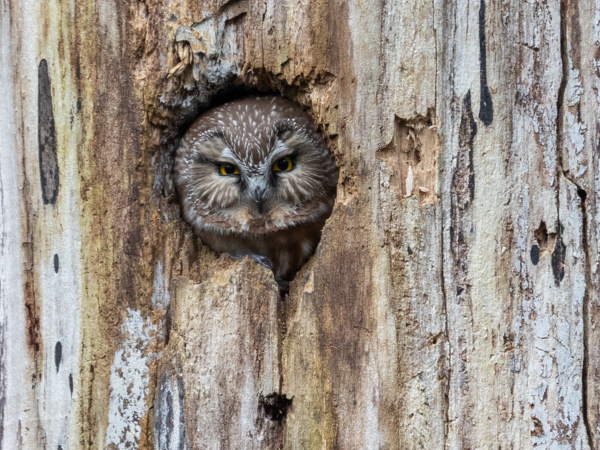
We read about portrait lighting when deciding where to place the lights. It was helpful, but most portrait subjects aren't sitting inside a hole in a tree, so some variation was required. The upshot is put lights on each side of the camera, close enough to reduce shadows, but not so close you get the (infra)red-eye effect, see the photo below.
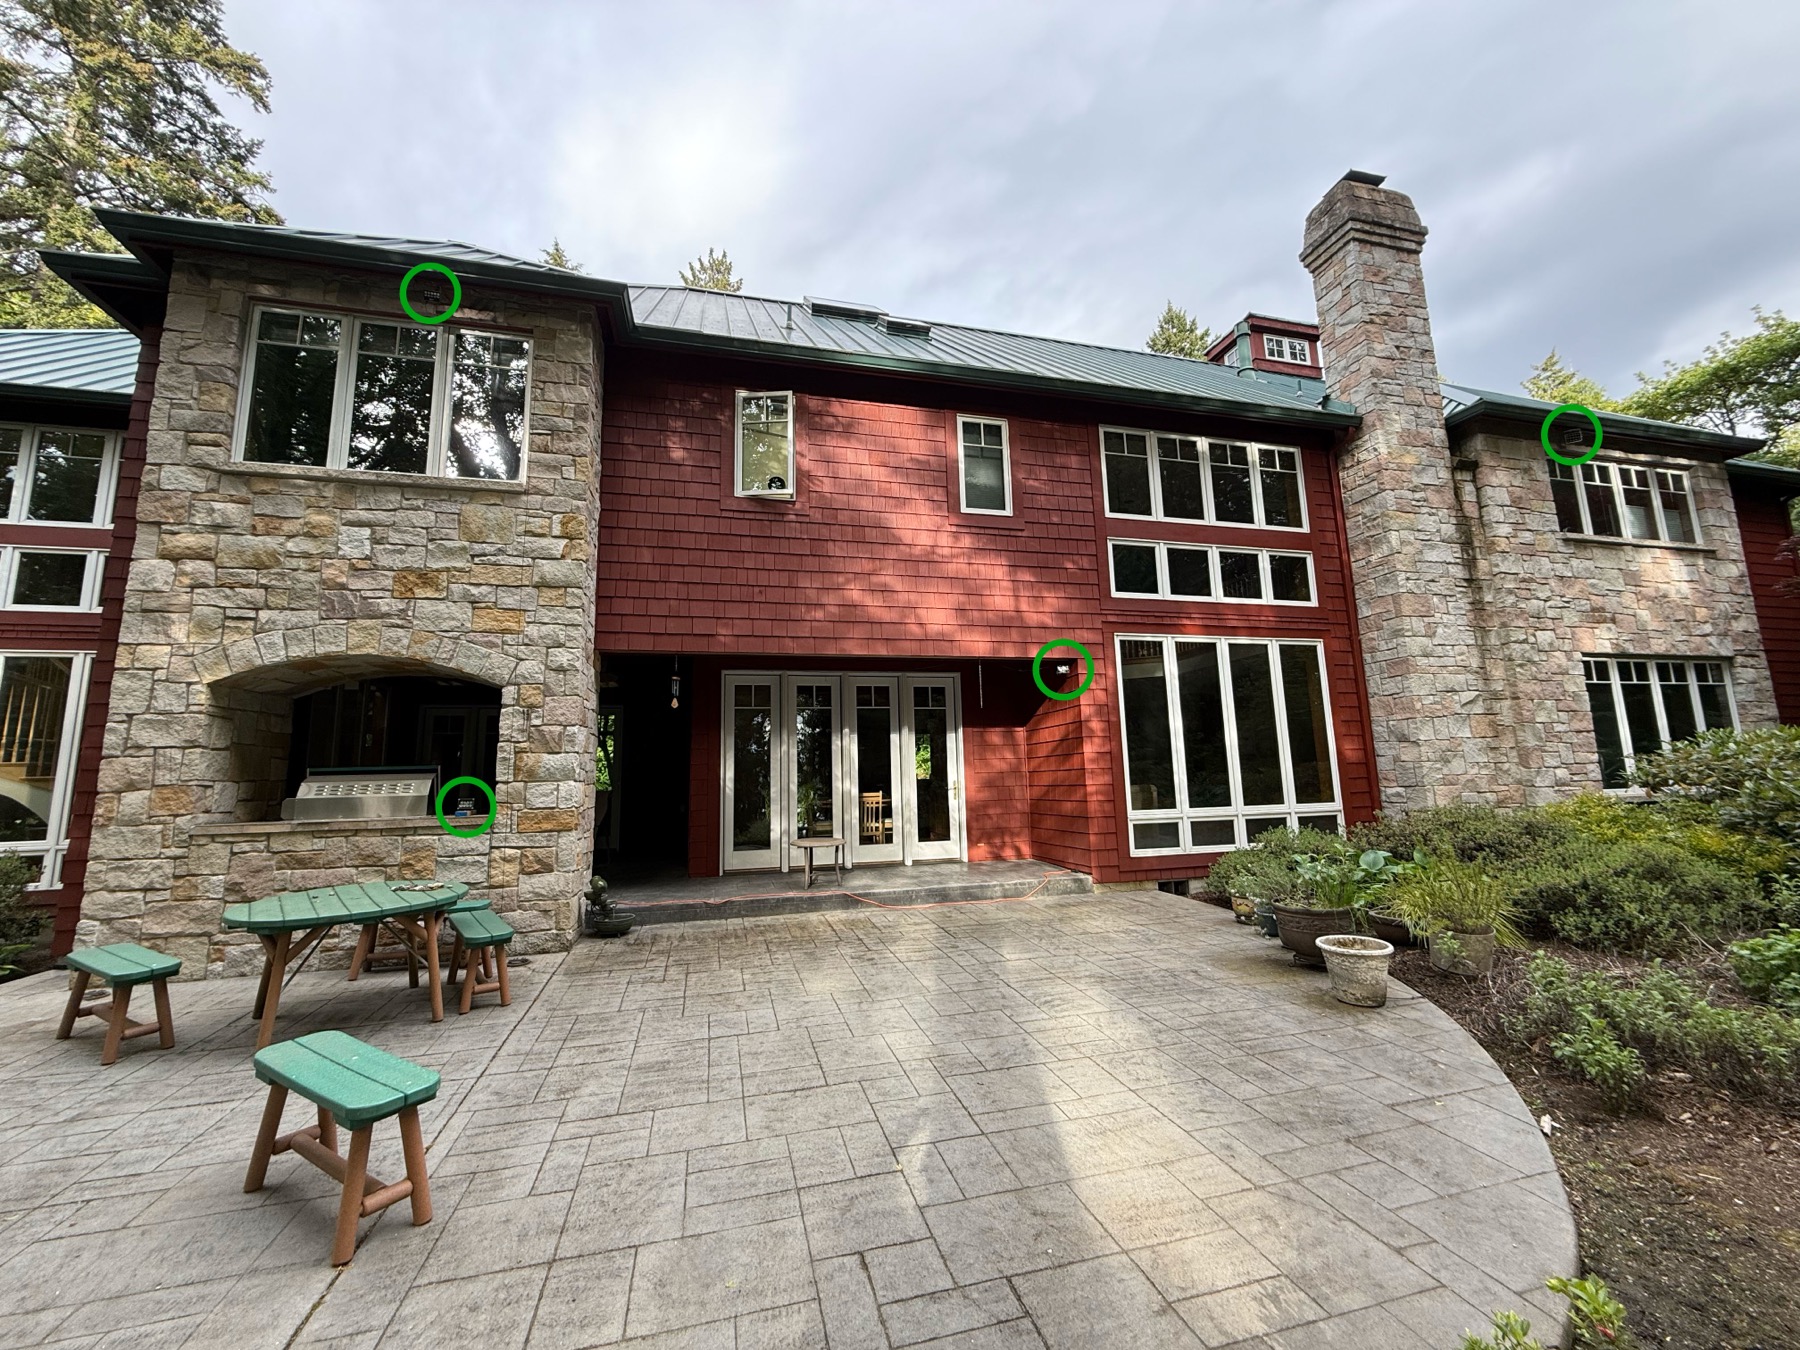
Windows
Shooting photos through a window is never great, but it's incredibly bad when using IR. The energy-efficient, double-pane windows in our house reduce visible light by about 38% (2/3 of an f-stop), but reduce 850nm infrared by a whopping 80% (2 2/3 f-stops). If you put both the IR light and the camera behind windows like ours, you will lose over 5 f-stops of light into the camera.
Finding a way to shoot the subject directly without going through window glass dramatically improves the light capture and thus the shutter speed and quality of the photos. So even if the owl nest is in your backyard straight out a convenient window, it's worth finding a way to avoid shooting through a window. Keep reading to find out how we got the window out of the equation.
Owl Blind
Ok, it's just a board over a window, but it made such a huge difference in our nighttime photos that we just have to talk about it.
We were shooting through a double-pane window with a high-end lens, clearly not ideal for optical quality, but we wanted to keep the bugs out and the warm air in. However, the light attenuation when shooting IR was a big problem. Setting up outside and leaving expensive, rented camera equipment unattended overnight didn't seem like a good idea.
To get the window out of the light path, we built an owl blind. Our windows have slots for removable screens. If we could make something to sit in that slot and seal the frame while leaving an opening for the camera, we could open the window for our photography. Cathy made a mechanical drawing for what we wanted: a precise rectangle with a circular hole for the lens and a rectangular opening for IR light panel #3. We sent that off to a local plastic fabricator, but they had a one-week lead time and we didn't know if the owls would still be around in a week. A trip to Home Depot yielded a sheet of 1/4" plywood that Tom cut to match Cathy's specs.
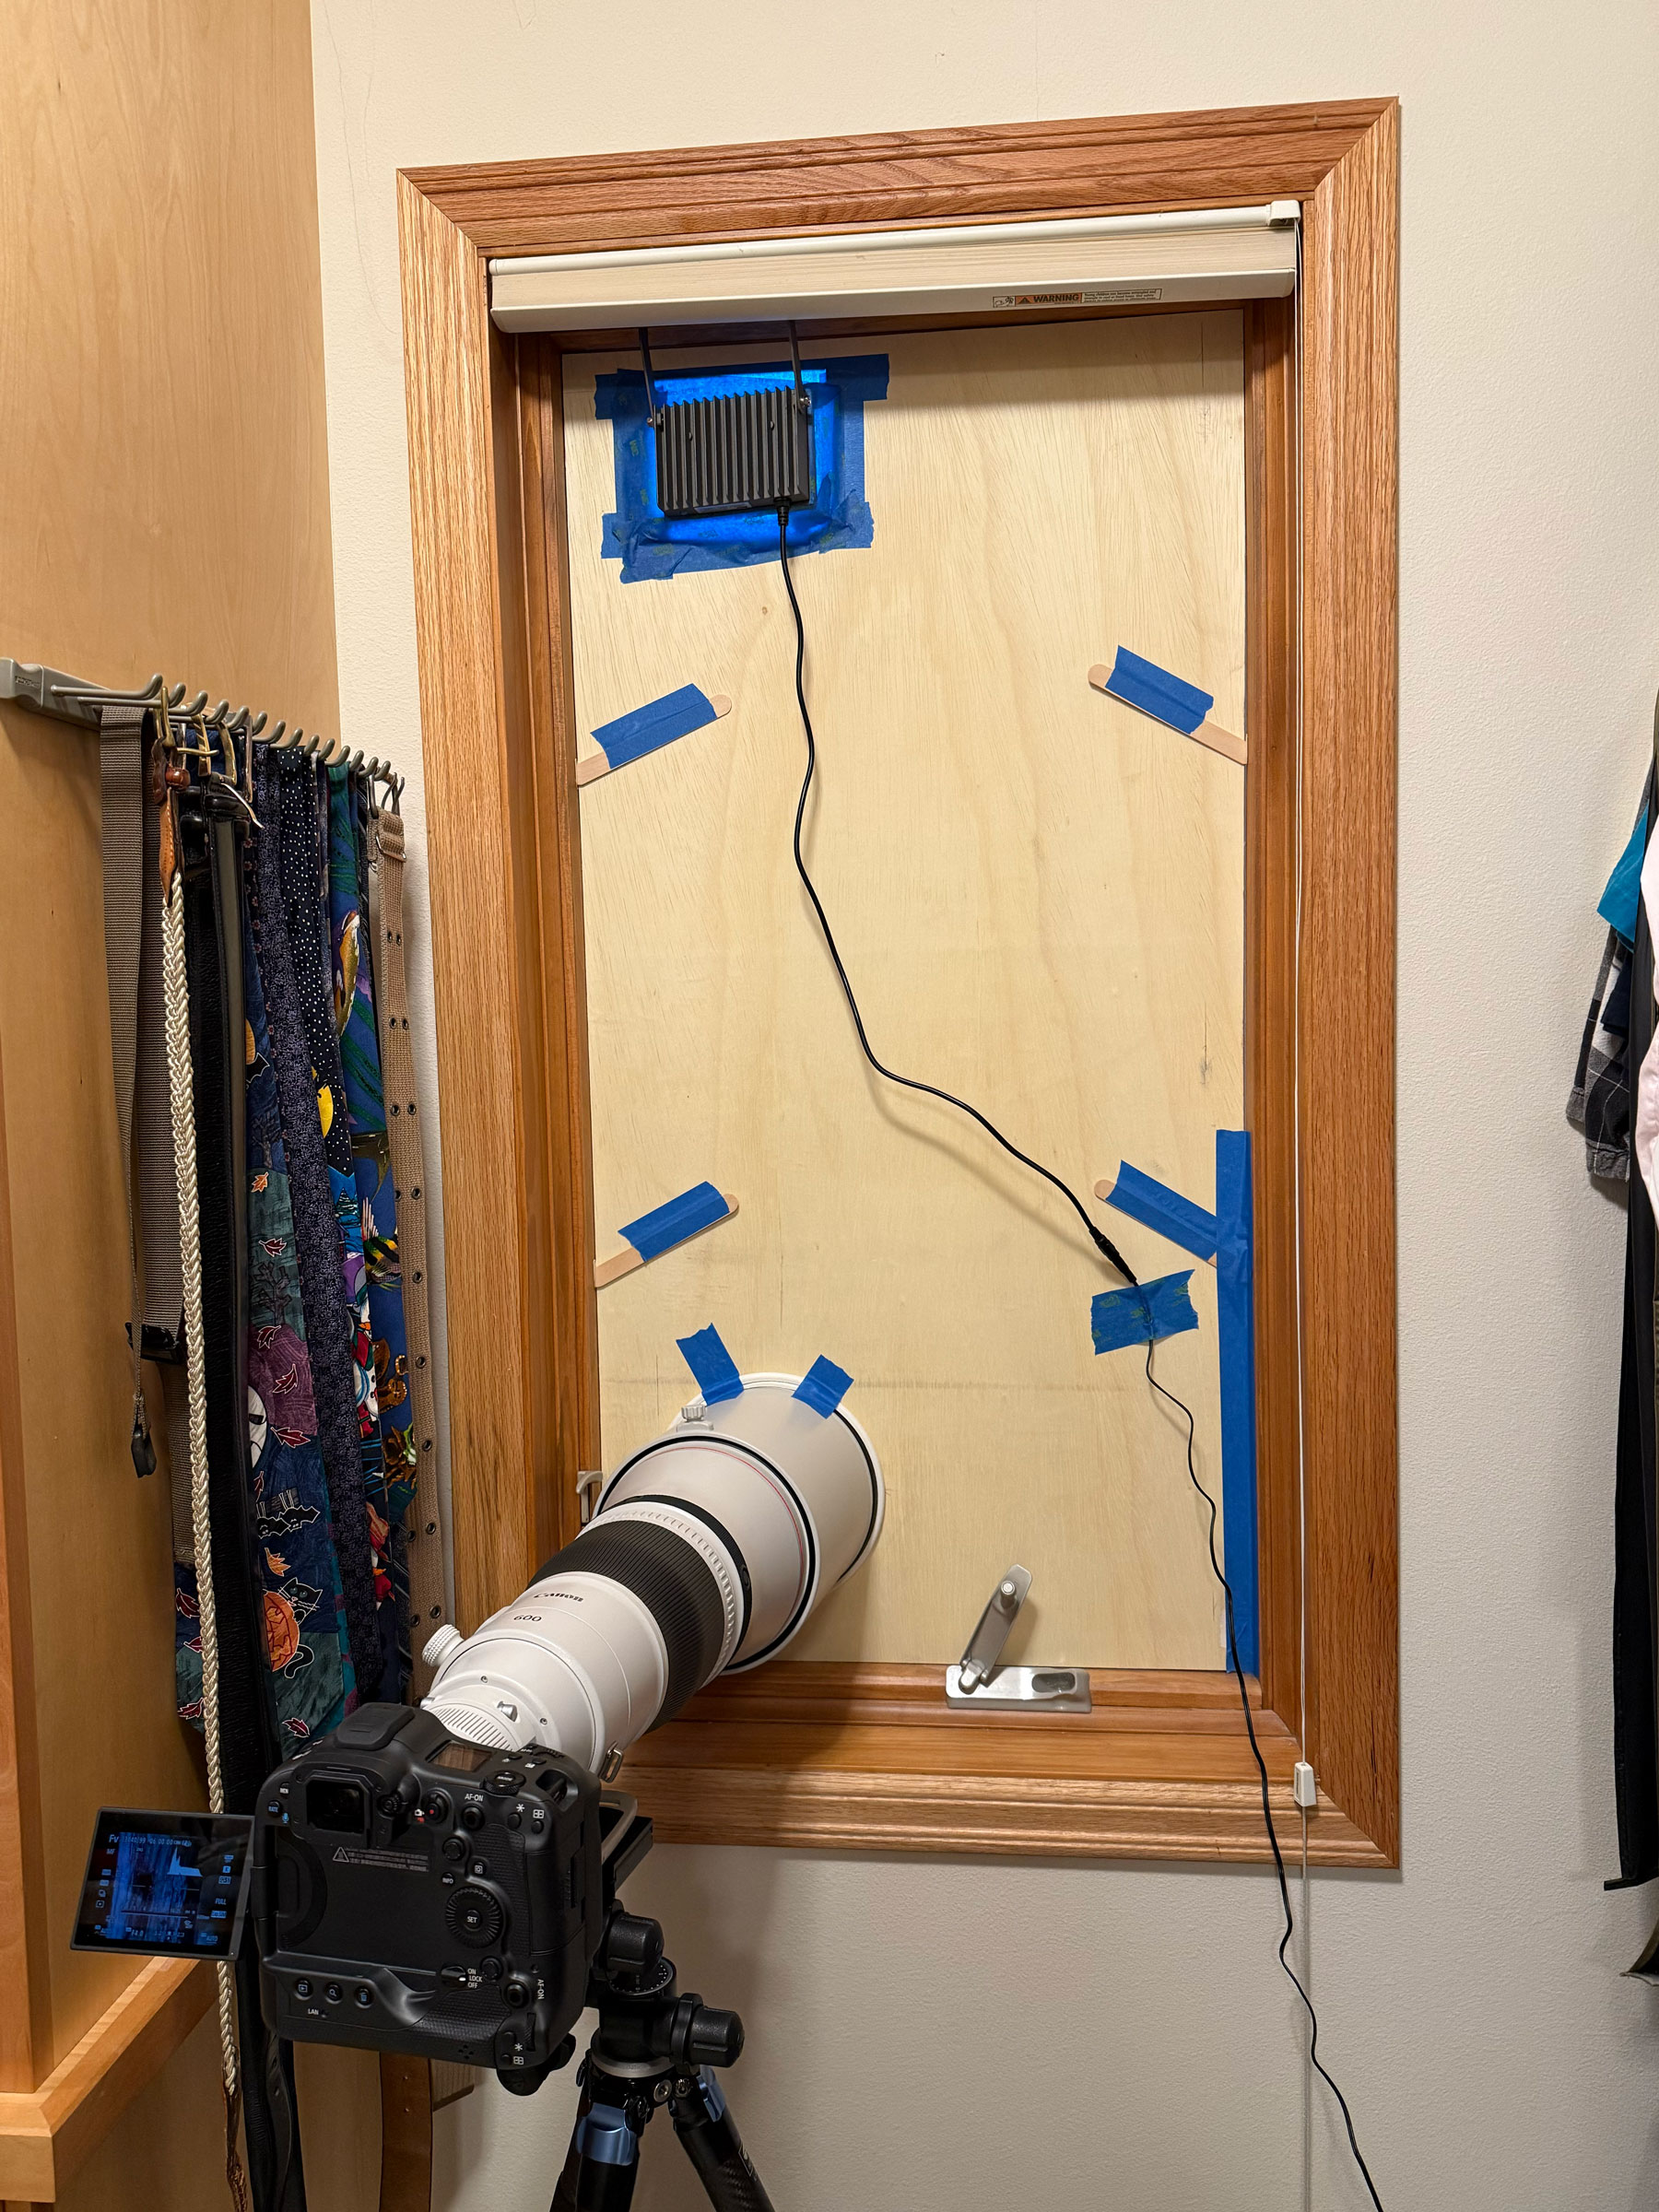
In addition to being able to open the window for the camera, this also gave us a way to mount the third IR panel outside and high enough to maybe counter the shadows from the other two lights at ground level.
Not surprisingly, removing the glass from in front of the lens and the third light made a huge difference. We were able to cut the ISO in half and drop the shutter speed by a factor of 26.
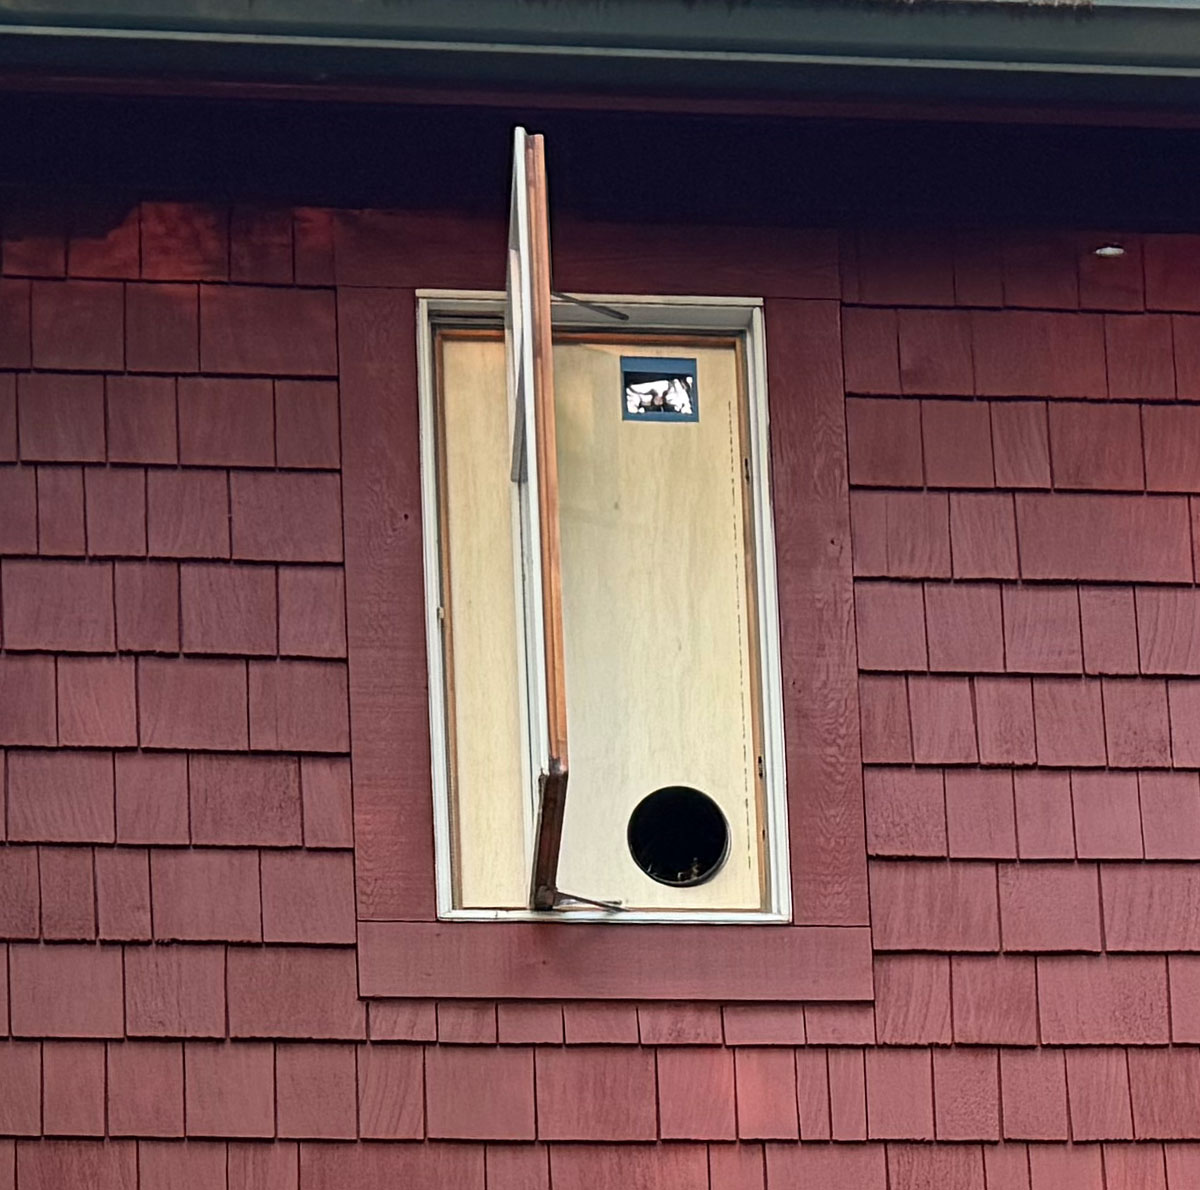
In the photo below, the three light panels are reflected in the owl's eyes. The number of lights we were using can be seen in many of our night photos. It's kind of cool, and is easy enough to fix later if so desired. Unfortunately, when we added the third light in the same window as the camera, it caused the classic red-eye problem we've all seen from a flash mounted on a camera.
We moved the third light to a spot under the eaves above a nearby window. That made it less effective at lighting the nest even though it was still outside, so we added a fourth panel (15 watts) in the eaves above a window off to the other side to add light and help reduce shadows. The Grizwolds have nothing on us, at least in invisible IR light. The camera window is partly closed in the photo below because it had been raining.
Creating Timelapse Video
The challenge with wanting to see everything the owls do is finding a way to review all of those photos. There are two aspects to the challenge: we need to take photos frequently, so there are a lot of them, and most of them are boringly the same. The good news is we don't need to carefully examine each one, the difference between an empty opening and an owl appearance is pretty obvious even at a quick glance. Our solution is to review the photos as a timelapse movie at 30 frames per second. We found several ways to create these movies.
In-Camera Timelapse
Many modern cameras have the ability to create a timelapse movie directly on the camera. For the Canon cameras we use, you set the interval between frames and the number of frames then start the camera going. The camera then builds an MP4 movie from those frames. When you play the movie, you can review a lot of nearly-the-same images quickly and it's super easy to spot things that change, like when the owl pops up into the opening. For example, if you shoot a timelapse taking a photo every 6 seconds for 6 hours you get 3,600 frames and you can review the movie in 2 minutes. That's good leverage.
This works very well for some applications, but it has several issues for this purpose. When you find something interesting, you can extract a frame from the video, but that frame is likely lower resolution than the camera can produce, it's compressed like a JPEG, and it doesn't have the level of data that a RAW photo provides for further processing of the photo. We normally shoot RAW photos so there's no compression messing up detail and enough data there that we can process the photo to adjust exposure, bring up detail in the shadows, etc. Just having a lower resolution JPEG doesn't cut it. Also, the Canon cameras have this perplexing limit of 3,600 frames in a timelapse, which puts a limit on how long a timelapse can run that depends on how frequently you take frames. At one frame every 6 seconds, you are limited to a 6-hour timelapse. At one frame every 3 seconds, you are limited to a 3-hour timelapse. Needing to go restart the timelapse every few hours is pretty inconvenient, especially at night. Maybe that's just a Canon weirdness.
Creating a Timelapse from Stills
Another approach to making a timelapse to review a lot of similar photos for occasional events is to automate taking a lot of photos, then make the timelapse after downloading all of images to a computer.
On a Mac, the included QuickTime Player can be used to turn a sequence of photos into a timelapse. From the File menu, choose "Open Image Sequence," chose a bunch of photos, hit the "Choose Media" button, then select options for encoding the movie. Tom likes doing 30 frames per second to make the math easier and encode "for smaller file size (HEVC)" which doesn't seem to hurt the quality and cuts the file size in half.
Once you've built the timelapse, you watch it, and don't blink if you're looking for events that are short enough to be in only one frame. When you find something, do the math to convert the elapsed time to an approximate image number, go find that image, and now you have a full resolution RAW file of the cool thing you just caught in the timelapse. If you are doing this in the Quicktime Player and don't want to do the math to map seconds in the timelapse to an approximate image number, go to the View menu, select "Time Display" and choose "Frame Number". Now instead of showing seconds elapsed, it shows what frame you're on. If you're looking at frame 1,234, go to image number 1,234 in your folder of stills and there's the file you want.
This is pretty awesome, but it has its own annoying limitation. Quicktime Player has a bug that makes it unable to save the the timelapse movie file if you choose too many photos. When you try to save the movie it brings up an error message saying you lack permission to save the file, which makes zero sense. The limit is somewhere between 2,700 and 3,000. It's like Canon and Apple got together and said, "let's make it as difficult as possible to make a timelapse movie with over 3,000 frames."
Extracting Thumbnails with ExifTool
It's pretty slow to create a timelapse from RAW files, presumably because it takes computation to turn a RAW file into an usable image for building the movie. If you're comfortable using command line apps in the Terminal, there's a nice way to speed that up. RAW files and other large images often contain smaller thumbnail images that can be used to show a quick preview when viewing a lot of files. Our Canon cameras embed three such thumbnails at various sizes.
There's a free program called ExifTool by Phil Harvey that makes it easy to read, write and edit image metadata. If you do a lot with images and need to extract metadata like when and where the photo was shot, the exposure parameters, etc., ExifTool is your friend. One of the many things it can do is extract the thumbnail images from large image files.
Here's the command line to extract all the thumbnails from a single image file called EXAMPLE.CR3 and dump them into a folder named FOLDER. In the command line, replace EXAMPLE.CR3 and FOLDER with the name of your test file and the name of the folder where you want the thumbnails to appear.
exiftool -a -b -W FOLDER/%f_%t%-c.%s -preview:all EXAMPLE.CR3
This command creates one new file in FOLDER for each thumbnail the CR3 file contained, each named with the original file name followed by the name of the thumbnail. With Canon RAW CR3 files, you'll get three files:
EXAMPLE_JpgFromRaw.jpg
EXAMPLE_PreviewImage.jpg
EXAMPLE_ThumbnailImage.jpg
Look at the sizes and quality of the files produced and decide which one you want to use
to create a timelapse.
The quality of the the images doesn't have to be great, just good enough that you can
spot any interesting action, then go back to the original RAW file to see it in its full glory.
Replace the -preview:all portion of the command line with -preview:name_of_thumbnail.
For our cameras, the thumbnail image sizes are 160x120, 1620x1080 and 6000x4000.
For reviewing our owl photos, the middle resolution "PreviewImage" is plenty.
This command can be used to extract those thumbnails from all the files in a folder:
exiftool -a -b -W FOLDER/%f_%t%-c.%s -preview:PreviewImage /path/to/images
After that finishes, you can use the Quicktime Player to create a timelapse from those thumbnail images. The compression will be faster and the timelapse movie file will be smaller compared to creating the movie from the full size RAW files.
Creating Timelapse Movies With FFmpeg
FFmpeg is free program for manipulating video and audio files. Among the many things it can do is create a timelapse movie from a folder of stills, just like Quicktime Player only with a command line interface and no bug that limits it to 2,700 files. Below is a command line to do it. It takes all of the jpg files in the current folder and turns them into a 30-frames-per-second MP4 movie named OUTPUT.MP4.
ffmpeg -framerate 30 -pattern_type glob -i '*.jpg' -c:v libx264 -pix_fmt yuv420p OUTPUT.MP4
See this Q&A on StackOverflow for more information.
Creating a Timelapse Movie from Another Movie
When we got to the point where we wanted to get movies of what the owls and owlets were doing, we were shooting 10 hours of video every night. Reviewing 10 hours of video per day is wildly impractical and if you try to fast forward through it you'll find it skips enough frames you can completely miss something like a fledge or mouse delivery. At the least, we needed a way to view consistently one frame every two seconds from the raw footage.
Once again, FFmpeg comes to the rescue. Here's a command line to take the file INPUT.MP4, extract every 60th frame (one every two seconds), produce a new movie at 30 frames per second, and write it to OUTPUT.MP4. This turns a 6-hour movie into a 6-minute timelapse.
ffmpeg -i INPUT.MP4 -vf setpts=PTS/60 -pix_fmt yuvj420p -c:v libx264 -crf 23 -r 29.970030 OUTPUT.MP4
If you want to see one frame from every second in the original, because you want to catch something that takes less than 2 seconds to happen, change the PTS/60 to PTS/30 and that will turn a 6-hour movie into a 12-minute timelapse.
One more trick: when one of our cameras shoot video in portrait mode, it plays in landscape so the image is sideways. 🙄 It's easy enough to have Quicktime Player rotate the movie, but FFmpeg can extract the timelapse and rotate it so it just plays correctly. You just add a "transpose=2" term to the -vf option.
ffmpeg -i INPUT.MP4 -vf "setpts=PTS/60,transpose=2" -pix_fmt yuvj420p -c:v libx264 -crf 23 -r 29.970030 OUTPUT.MP4
Here's a StackOverflow answer and a FFmpeg cheat sheet that explain the rotation options.
Extracting Clips From a Movie
There's one more thing that FFmpeg helped solve: how to easily extract a clip from a giant movie. We were capturing 10 hours of video per night and one of the chunks was around 6 hours, which weighs in at over 300 GB. Maybe that's more than you want to keep around for two or three 2-minute segments, but you also don't want to do any re-encoding that might degrade video quality. FFmpeg can extract clips with a copy operation that doesn't re-encode the video.
Here's a command to start at 1 hour, 3 minutes and 53 seconds into INPUT.MP4 and write out the next 1 minute and 30 seconds to OUTPUT.MP4. There may be a little bit of slop on the starting point because it has to start at a key frame, so start a little early and run a little long.
ffmpeg -ss 01:03:53 -i INPUT.MP4 -t 00:01:30 -c copy OUTPUT.MP4
Video Timecodes
The movies recorded by our IR Canon camera had embedded SMTP timecodes that seemed random
and caused issues when trying to seek to specific locations in Quicktime Player.
To avoid that issue in movies you make with FFmpeg, add -timecode 00:00:00.0
to the ffmpeg command line when building or extracting videos.
Shotcut Video Editor
We used Shotcut to turn our footage into the videos here. It's a free, open source, cross-platform video editor. That means Tom gets to leverage all the techniques and workflow that Cathy has developed. With it, we could turn the monochrome infrared images into black and white, adjust the brightness, lighten the shadows, zoom, crop, and use audio filters to reduce the background noise in the owlet chirping video. The project files are lightweight, around 10 KB for simple projects so it's cheap and easy to preserve steps along the way to making a video by just doing a Save As after each step.
We also found Shotcut to be a nice way to view timelapse video and mark the interesting points. Some of the timelapse movies created with FFmpeg wouldn't play correctly in Quicktime Player but worked just fine in Shotcut, another reason to use it for reviewing timelapse video.
Return: Overview |
 |
|
©1996-2026 Tom and Cathy Saxton. You may not copy or reproduce any content from this site without our consent.